Melihat TraceRoute Windows XP di Wireshark
Apakah ada yang belum mengetahui fungsi traceroute ? Saya rasa semua pasti sudah tahu, karena traceroute adalah program sederhana untuk melihat hop-hop dari computer kita ke suatu IP address di Internet. Di bawah ini adalah hasil copy paste dari traceroute notebook saya ke www.yahoo.com.
C:\>tracert www.yahoo.com
Tracing route to www.yahoo.com [209.131.36.158]
over a maximum of 30 hops:
1 1 ms 2 ms 2 ms AlliedTelesyn.ATI [192.168.1.1]
2 39 ms 36 ms 36 ms 1.subnet125-161-216.speedy.telkom.net.id [125.16
1.216.1]
3 * * * Request timed out.
4 40 ms 40 ms 41 ms 61.5.116.25
5 37 ms 35 ms 36 ms 61.5.119.110
6 255 ms 258 ms 255 ms tm.net.my [58.26.87.53]
7 349 ms 470 ms 350 ms 58.27.103.33
8 475 ms 353 ms 363 ms 203.106.6.162
9 353 ms 352 ms 355 ms 219.94.9.178
10 353 ms 343 ms 345 ms 58.27.101.158
11 343 ms 341 ms 357 ms ae1-p171.msr2.sp1.yahoo.com [216.115.107.87]
12 347 ms 353 ms 355 ms ae0-p171.msr2.sp1.yahoo.com [216.115.107.83]
13 353 ms 351 ms 359 ms www.yahoo.com [209.131.36.158]
Trace complete.
Untuk lebih memperdalam mengenal paket pada jaringan, saya mencoba menangkap paket traceroute ini dengan wireshark. Setelah itu, saya bandingkan hasil yang ada di wireshark dengan copy paste text output di atas. Cukup menarik, dari sini saya bisa belajar mengenal traceroute yang ada pada Windows.
Lanjutkan Membaca Melihat TraceRoute Windows XP di Wireshark…
Lanjutkan Membaca Melihat TraceRoute Windows XP di Wireshark…
Bermain-main Display Filter pada Wireshark
Filter merupakan fitur ampuh yang harus kita pahami dalam bermain wireshark. Kenapa? Karena pada saat kita mau mulai menganalisa paket, lebih baik kita berhadapan dengan paket-paket yang memang kita ‘mau perhatikan’ saja. Apabila seluruh paket jaringan, termasuk paket-paket kurang penting juga muncul di layar kita, bisa-bisa kita pusing duluan.
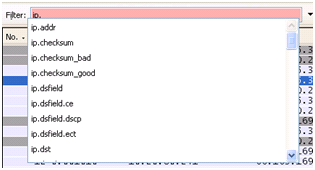
Field Filter, yang ada di kiri atas, adalah tempat di mana kita memasukkan filter-filter yang kita inginkan. Wireshark yang terbaru memiliki kecanggihan fitur auto-complete, sehingga sangat mempermudah buat kita yang malas mengingat tentang paket-paket, atau bahkan belum tahu apa yang harus diketik di filter field tersebut. Sebagai contoh, pada saat kita ketik “ip.” maka akan ditampilkan option-option selanjutnya yang bisa diketik.
Meng-capture Menggunakan Wireshark
Untuk menangkap paket jaringan menggunakan Wireshark, terlebih dahulu harus diperhatikan dengan cermat posisi peletakkan wireshark dalam jaringan, seperti contoh pada artikel sebelumnya. Peletakkan wireshark yang tidak tepat akan menyebabkan tidak adanya paket yang ditangkap.
Penangkapan paket sederhana
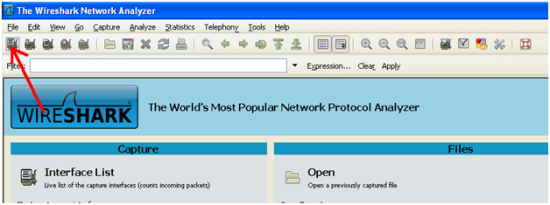
Untuk mulai melakukan penangkapan paket, tinggal click pada button seperti di bawah ini,
Understanding How Windows XP ‘Finds’ Other Windows XP using Wireshark
Most of us are Windows XP fans, and almost every day we communicate to other computer doing file sharing, printer sharing, etc. Of course, it works easily without knowing what are happening behind this. And some of us are just enough with this. But to be honest, if we know how it works behind the scene, it will give us a very good understanding on the ‘packet level’ in how it works. Especially, if we are planning to migrate our network from L2 to VLAN L3 routing.
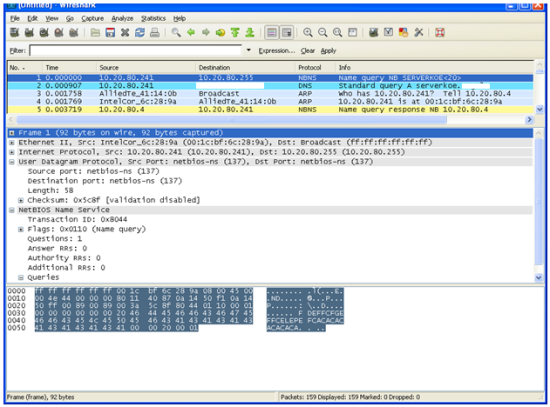
Before I wrote this article, I turned on my Wireshark, and just easily did a ‘Start > Run’ and then typed \\serverkoe, where serverkoe is basically my server sitting on the LAN and in the same subnet with me. Hopefully this small packet walkthrough will add small knowledge for you.
Learning to Analyze Web Traffic using Wireshark
This article assumes that you are familiar with networking basics such as MAC addressing, TCP/IP stuff, browsing, and internet-related activities.
First packet we capture using wireshark after we type www.google.com in my browser is below : ( You can either download my capture file here, or just install/run your wireshark and open google.com ).
For first starters who never uses wireshark before, let us get familiar with this free and amazing tools !
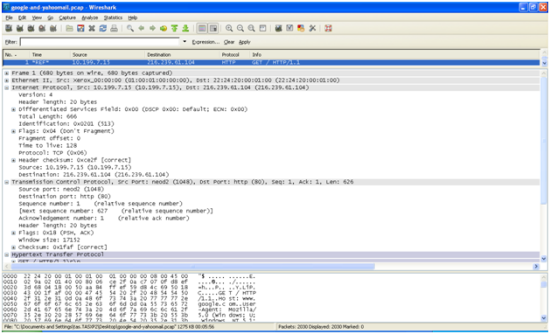
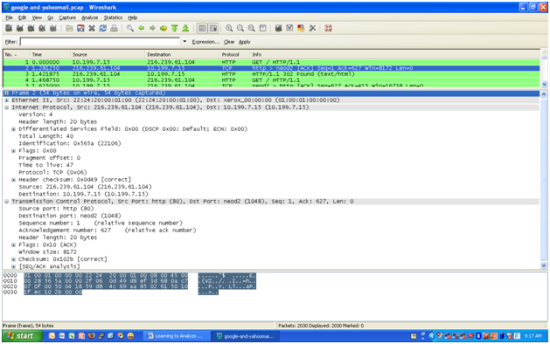
Please check the first row, it is said : Frame 1 ( 680 bytes on wire, 680 bytes captured ).What does it mean ? It means that this first packet has 680 bytes, and you get all the packet. Are there possibilities we don’t get the whole packet ? Of course ! Sometimes we just want to record partial part of a packet in order to minimize our disk space usage, we can limit that in Capture > Options. You can expand (+) this first row to see further explanation, such as arrival time of the packet, etc.
Let’s check the second group line, which is Ethernet II, Src : ….. , Dst : …… We should easily understand, that these Src and Dst are the MAC addresses of our computer and our gateway. In my capture file, I am using dial-up, but if you capture in Ethernet environment, it will reveal your LAN adapter and gateway MAC address.
The 3rd group line, Internet Protocol , Src : 10.199.7.15, Dst : 216.239.61.104. It is clear that in this capture, my dial up IP address is 10.199.7.15 ( which is an internal/not public ip address ), and google.com web server that serves me is 216.239.61.104 ( well, it could be different if you try yourself because a web site might be handled by a lot of load-balancing different servers ). Inside this IP information, we can understand that our IP is version 4 with header length of 20 bytes ; Differentiated Services Field, which is useful to do Quality of Service; Flags : whether this packet is going to be fragmented or not and a simple checksum of source and destination header. Well, we are not going to go detail on this DSCP and Flags in this article.
The 4th group line, is Transmission Control Protocol, with Source Port : 1048 and Destination Port :80. Why is it 1048 ? This 1048 is automatically generated by our OS TCP/IP stack, and this number is important to keep track the flow of this specific stream. Meanwhile, as we might have understood, destination port : 80 is HTTP port. Sequence number is 1 (which is relative number). Wireshark called this relative number, because it is the first packet. The real acknowledgement number is ‘aa 84 ff ef’, we can get this number in my example, by clicking on the ‘sequence number’ row. The next sequence number is 627, this is because the length of the packet is 626 bytes. It means that, our computer is hoping to get this 627 in the reply of google.com.
We can see that this is what exactly happening, in the second packet, which is the direct reply packet from google, we can see that Acknowledgement number is 627. And we must notice as well, that all source and destination parameters has been reversed. For example, source IP and destination IP become reversed, which now Source is 216.239.61.104 and Destination is 10.199.7.15. Please also take note that source port and destination port has now been reversed as well, where source port is now 80 and destination port is now 1048. The combination between Source/Destination IP and Source/Destination Port is something that is very important. Because in a crowded environment, this is the parameter that we need to filter when we want to view only a specific packet stream.
First line up to 4th row line is the information from layer 2 until layer 4 in OSI protocol ( Data Layer = MAC address, Network Layer = IP address, Transport Layer = TCP Source/Destination Port ). Next, we will examine the next row lines, which is the application layer, the HTTP packet itself.
We go back to the first packet to see what are basically send by our browsers to the web servers when we just easily type www.google.com ?
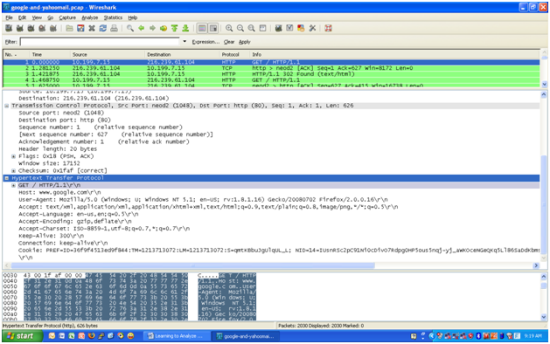
From the screen we can see that the first line is “GET / HTTP/1.1″, followed by “Host :www.google.com“, followed by “User-Agent”, which is the ID of our browser, and followed by a few parameters afterward. The detailed meaning of these parameters can be found in the HTTP protocol, which of course can be searched via google itself J. Also take a look at the Cookie part, where you can find “PREF=ID=….”. This the the cookie that is also sent by our browser to inform the web server where we are.
The easiest way how to see this HTTP stream is by following the TCP stream. So at packet number 1, right click and choose Follow TCP Stream. The results is as follows :
GET / HTTP/1.1
Host: www.google.com
User-Agent: Mozilla/5.0 (Windows; U; Windows NT 5.1; en-US; rv:1.8.1.16) Gecko/20080702 Firefox/2.0.0.16
Accept: text/xml,application/xml,application/xhtml+xml,text/html;q=0.9,text/plain;q=0.8,image/png,*/*;q=0.5
Accept-Language: en-us,en;q=0.5
Accept-Encoding: gzip,deflate
Accept-Charset: ISO-8859-1,utf-8;q=0.7,*;q=0.7
Keep-Alive: 300
Connection: keep-alive
Cookie: PREF=ID=36f9f4513ed9f844:TM=1213713072:LM=1213713072:S=qmtKBbuJgUlqUL_L; NID=14=IUsnRSc2pC91Ni0cDivO7Rdpg0HP5ous5nqj-yj_aWKOceNGeQKq5Ll86SaDdKbmsdpGLEAv3NqzDqgHDj7FME9HjkCye_G0S3MmzHlb7CNqmROIvX1IBF47zxFxt3Xq
HTTP/1.1 302 Found
Location: http://www.google.co.id/
Cache-Control: private
Content-Type: text/html; charset=UTF-8
Date: Sat, 13 Sep 2008 23:48:11 GMT
Server: gws
Content-Length: 221
<HTML><HEAD><meta http-equiv=”content-type” content=”text/html;charset=utf-8″>
<TITLE>302 Moved</TITLE></HEAD><BODY>
<H1>302 Moved</H1>The document has moved<A HREF=”http://www.google.co.id/”>here</A>.
<TITLE>302 Moved</TITLE></HEAD><BODY>
<H1>302 Moved</H1>The document has moved<A HREF=”http://www.google.co.id/”>here</A>.
</BODY></HTML>
The blue color / second paragraph above is the reply from the server. Although without knowing much about HTML page, we can understand that the reply is telling our browser that the document has been moved, and redirect to www.google.co.id. When we use ‘Follow TCP Stream’, the Wireshark will automatically creates a filter . The filter can be seen in the filter field : (ip.addr eq 10.199.7.15 and ip.addr eq 216.239.61.104) and (tcp.port eq 1048 and tcp.port eq 80). Since we no longer needs this filter, just press the Clear button to delete the filter and show all packets.
The journey continues on packet number 4, where our browser is now issuing another GET HTTP command. This time, the destination host is www.google.co.id, and the tcp source port is 1053, with destination port is 80 (HTTP). Please take note this ’1053′ number, since we will track the
Packet number 5, is still the acknowledgement of our PC regarding the previous packet, so we will ignore this packet. Also packet number 7, which is the ‘reassembled PDU’ packet generated by Wireshark.
The continuation of my www.google.co.id is found in packet number 6, which is the ACK packet of the server, and continued by packet number 8, which is another ACK generated by my PC. The real html data will start from packet number 9, which is generated by the server itself.
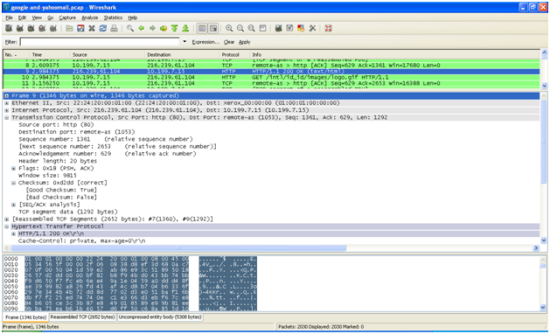
When my browser receive this packet, it analyses the content, and found out that it needs to download some more file to make the page complete. We can see it in the next packet, where my browser issues another GET /intl/id_id/images/logo.gif HTTP/1.1. This request is using TCP source port 1050, and of course with TCP destination port of 80 (HTTP).
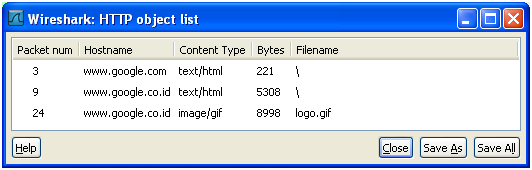
So, right now, I have 2 opened source port, that is 1053 for the html file ofwww.google.co.id, and 1050, which is the logo.gif. Now, let’s assume I want to save that logo.gif, there is a very easy way to do this. Wireshark is indeed very cool. Go to File, Export, Objects, HTTP. From there, I just click logo.gif, and save it. That’s it… So simple !
Hopefully from this small article, I can give you a glimpse on how to use Wireshark to read packet. If you don’t want to capture yourself, just download from the following link.
Just let me know if the link is dead already

Tidak ada komentar:
Posting Komentar
Silahkan sobat tanggapi artikel dan blog saya dengan komentar anda...... .....
tapi saya mohon jangan beri komentar spam atau komentar beserta link